
This course has been updated!
A new version of this course is now available, updated to reflect best practices for more recent versions of the Android framework and Android Studio. The new course is available at Android Developer Fundamentals course (Version 2), or go directly to the new Concepts reference.
This course is now deprecated and this content will be removed from this site soon. Please update your links.
14.1: Firebase and AdMob
Contents:
This lesson covers three topics:
- Firebase, a set of tools for mobile and web app developers
- Making money from your Android app
- Running ads using AdMob
Firebase
Firebase is a set of tools for app developers, but not just for Android app developers. It is for iOS app developers and web app developers too. However, since this is a course about Android development, this lesson only talks about how to use Firebase with Android apps.
As an Android developer, you use Android Studio to build your app, but you can use Firebase to add features to your app, get a wider audience for your app, test your app, earn revenue from your app, and get analytics on the usage of your app.
This chapter does not discuss everything about Firebase, but it introduces Firebase, helps you get started using it, and highlights important features that you might want to use.
Get started with Firebase
To use Firebase, go to the Firebase console at https://console.firebase.google.com/. You will need to have a Google account.
The first time you go to the Firebase you see a welcome screen that includes a button to create a new project.

To use Firebase features with your Android app, first create a Firebase project and then add your Android app to the Firebase project.
A project is a container for your apps across platforms: Android, iOS, and web. You can name your project anything you want; it does not have to match the name of any apps.
- In the Firebase console, click the CREATE NEW PROJECT button.
- Enter your Firebase project name in the dialog box that appears then click Create Project.

- The Firebase console opens. Look in the menu bar for the name of your project.

Add your Android app to your Firebase project
The next step is to associate your Android application with your Firebase project. First though, get the information you will need. To connect Firebase to your Android app, you need to know the package name used in your app. It's best to have your app open in Android Studio before you start the process.
To connect your Firebase project and your Android app to each other:
- In Android Studio, open your Android app.
Make sure you have the latest Google Play services installed.
Tools > Android SDK Manager > SDK Tools tab > Google Play services.
Note the package of the source code in your Android app.
- In the Firebase console, Click Add Firebase to your Android app.
- Enter the package name of your app in In the dialog box that appears.

- Click Add App.
Firebase downloads a file called
google_services.jsonto your computer. Save it in a convenient location, such as your Desktop. (If you have any trouble, click Project Settings (the cogwheel next to Overview) and download the file manually.) - Find the downloaded file on your computer.
- Copy or move that file into the app folder of your project in Android Studio. The wizard in Firebase shows where to put the file in Android Studio.
- In the Firebase console, click Continue. The screen now shows the instructions for updating your build.gradle files.
In Android Studio, update the project-level build.gradle (Project: app) file with the latest version of the google-services package (where x.x.x are the numbers for the latest version. See the Android setup guide for the latest version.)
buildscript {
  dependencies {
    // Add this line
    classpath 'com.google.gms:google-services:x.x.x'
  }
}
In Android Studio, in the app-level build.gradle (Module: app) file, at the bottom, apply the google-services plugin.
// Add to the bottom of the file
apply plugin: 'com.google.gms.google-services'
In Android Studio, sync the Gradle files.
- In the Firebase console, click Finish.
Your Android app and your Firebase project are now connected to each other.
Firebase Analytics
You can enable Firebase Analytics in your app to see data about how and where your app is used. You will be able to see data such as how many people use your app over time and where in the world they use it.
All the data that your app sends to Firebase is anonymized, so you never see the actual identity of who used your app.
To get usage data about your app, add the firebase-core library to your app as follows:
- Make sure you have added your app to your Firebase project.
In Android Studio, make sure you have the latest Google Play services installed.
Tools > Android SDK Manager > SDK Tools tab > Google Play services
Add the dependency for firebase-core to your app-level build.gradle (Module: app) file:
compile 'com.google.firebase:firebase-core:x.x.x'
After you add the firebase-core library to your app, it will automatically send usage data when people use your app. Without having to add any more code, you will get a default set of data about how, when, and where people use your app. Not only do you not have to add any code to generate default usage data, you don't even have to publish your app or do anything else to it other than use it.
When someone does something in your app, such as click a button or go to another activity, the app will log an Analytics event. This means that the app will package up the data about the event that happened, and put it in the queue to send to Firebase.
Check to see if the analytics event occurs
Android sends Analytics events in batches to minimize battery and network usage, as explained in this blog post. Generally speaking, Analytics events are sent approximately every hour or so to the server, but it also takes additional time for the Analytics servers to process the data and make it available to reports in the Firebase console.
While you are developing and testing your app, you don't have to wait for the data to show up in the Analytics dashboard to check that your app is logging Analytics events. As you use your app, make sure your logcat is displaying "Debug" messages. Look in the log for statements such as:
Logging event (FE): _e, Bundle[{_o=auto, _et=5388, _sc=SecondActivity, ...}]
These kinds of log messages indicate that an Analytics event has been generated. In this example, an Analytics event was generated when the SecondActivity started.
View reports in the Firebase Analytics dashboard
To see the Analytics reports, open the Firebase Console and select Analytics. The dashboard opens showing reports for your app for the last 30 days.

Default Analytics
The analytics information you get by default includes:
- Number of users
- Devices your users used
- Location of the users
- Demographics such as gender
- App version
- User engagement
- And more
For a full list of the available reports see the Firebase help for the Dashboard.
Here's an example of a report showing the number of people who used an app in the past 30 days:

And here's an example of a report showing the users' locations:

Other kinds of Analytics data
To see usage data for your app beyond the default reports, you need to add code to your app to send an "Analytics event" at the appropriate point in your app.
In your app's main activity, define a variable for the instance of
FirebaseAnalyticsfor your app.FirebaseAnalytics mFirebaseAnalytics;In the main activity's
onCreate(), get the instance ofFirebaseAnalytics.mFirebaseAnalytics = FirebaseAnalytics.getInstance(this);- To send usage data in your app, call
logEvent()on theFireBaseAnalyticsinstance.
You can log Analytics events either for pre-defined events or for your own custom events. The predefined events include:
- ADD_PAYMENT_INFO
- ADD_TO_CART
- LEVEL_UP
- LOGIN
- SIGN_UP
and many more.
For example, to send an Analytics event when a user goes to the next level in your app, you could use code such as:
mFirebaseAnalytics.logEvent(LEVEL_UP, null);
The second argument is a Bundle that contains information describing the event.
You can explore the predefined events and parameters in the FirebaseAnalytics.Event and FirebaseAnalytics.Param reference documentation.
Read more about logging Analytics events in the Logging Analytics Events guide.
Firebase Notifications
You learned in a previous lesson how to enable your app to send notifications to the user. Using the Firebase console, you can send notifications to all your users, or to a subset of your users.
Type the message in the Notifications section of the console, select the the audience segment to send the message to, and then send the message.
To send the message to all users of your app, set the User Segment to App, and select the package for your app.

Behind the scenes, Firebase uses Firebase Cloud Messaging to send the notification to the targeted devices where the selected app is installed.

Best practices for sending notifications
The same kind of best practices are true for sending notifications from the Firebase console as they are for sending notifications from the app. Be considerate of the user. Send only notifications that are important. Do not irritate your users by sending too many notifications or notifications with unhelpful or annoying content.
Firebase Realtime Database
In this course, you learned the different ways your app can save data. You used SharedPreferences to save data as key-value pairs, and you saved data in Android's built-in SQLite database. You created a content provider to provide an interface to access stored data, regardless of how it is stored, and also to share data with other apps.
But how do you share data across multiple clients such as different devices and apps, including Android, iOS and web apps, and allow them to update the data and all stay synchronized with the data in realtime? For this, you need a central cloud-based data repository.
Firebase offers a database that provides cloud-based data storage, allowing clients to all stay in sync as the data changes. If an app goes offline, the data remains available. When the app reconnects to the Internet, the data is synced to the latest state of the database.
For more information, see the Firebase database guide at:
How data is stored
The Firebase Realtime Database is a NoSQL database. Data is stored as JSON objects. (You used JSON in the lesson about connecting to the Internet.)
You can think of the database as a cloud-hosted JSON tree. Unlike a SQL database, there are no tables or records. When you add data to the JSON tree, it becomes a node in the existing JSON structure with an associated key.
Here's an example of a JSON tree of data storing data about books and movies:
{
  "books": {
    "book one": {
      "title": "How to develop Android apps",
      "author": "Jane Developer"
    },
    "book two": {
      "title": "How to use Firebase",
      "author": "Adam Writer"
      },
    "book three": {
      "title": "How to search Google",
      "author": "Ava Searcher"
    }
  },
  "movies": {
    "movie one": {
      "title": "Saving the world",
      "main role": "Super man"
    },
    "movie two": {
      "title": "Saving the moon",
      "main role": "Bat girl"
      },
    "movie three": {
      "title": "Saving Mars",
      "main role": "Martian dog"
    }
   }
}
Here's an example of how this data appears in the Firebase Database console:

When you write code to access data in the database, you retrieve data items by their location. The location of the data is constructed by traversing the tree.
For example, the location to:
- books node is twoactivitiesfirebasedemo/database/data/books
- book one is twoactivitiesfirebasedemo/database/data/books/book%20one
- author of book one is twoactivitiesfirebasedemo/database/data/books/book%20one/author
Get and set data
You can use the Firebase console to view and update data in the database. Your app can use API calls to get and set data in the database.
Viewing and writing data in the Firebase console
In the Firebase console, you can add, edit and delete data.

You can also import and export data in the console. To import data, you must format the data as JSON and save it in a file with a .json extension.
Be aware that if you import a JSON file, it overwrites any data nodes that are defined in the file that already exist in the database.
Reading and writing data in your app
To use a Firebase database in your app, add the firebase-database library to your app, and then use methods on DatabaseReference:
- Make sure you have added your app to your Firebase project.
- Add the dependency for firebase-database to your app-level build.gradle (Module:app) file (where x is the latest version, see the Android Firebase Database developer guide for the latest version):
compile 'com.google.firebase:firebase-database:x.x.x' - To access the data from your Android app, use the methods in the
DatabaseReferenceclass.
The easiest way to construct and handle the data is to create a Java object that represents that data. For example, you could create the Book class:
public class Book {

    public String title;
    public String author;

    public Book() {
        // Default constructor is required
    }

    public Book(String title, String author) {
        this.title = title;
        this.author = author;
    }

}
To access the data from your Android app, use the methods in the DatabaseReference class to access, create, and update data. The DatabaseReference class represents a reference to a data item.
For example:
child()accesses a child node.setValue()sets the data at a node, and creates the node if it does not already exist.
To create a new data node:
- Get the reference to the parent of the new data node
- Call
child()to create a reference to the new child node. - Use
setValue()to set the value of the new node.
For example, suppose that you want to add a new book to the database with the following details:
- bookId = "book 4"
- title = "How to edit data"
- author = "Ann Editor"
To add this new book to the example data set shown previously, create an instance of DatabaseReference, and initialize it in the main activity's onCreate() method:
private DatabaseReference mDbBooksRef;
@Override
protected void onCreate(Bundle savedInstanceState) {
  // Create a new reference to the "books" node
  mDbBooksRef = FirebaseDatabase.getInstance().getReference("books");
  // rest of onCreate() …
}
Define a method to create a new Book object and add it to the database under the "books" node:
private void addNewBook(String bookId, String title, String author) {
    // Create a new Book object with the relevant details
    Book book = new Book(title, author);
    // mDbBooksRef is a reference to the "books" node
    // Create a child node whose key is bookId
    // and set its value to the new book
    mDbBooksRef.child(bookId).setValue(book);
}
Invoke the addBook() method as follows to create the new data item in the database:
addNewBook("book four", "How to edit data", "Ann Editor");
To learn more about reading and writing Firebase data in your app, see:
Access control
Firebase provides a set of rules to determine who is allowed to view and update data in a Firebase database. Learn how to create the rules in Get Started with Database rules.
Firebase Test Lab
The Firebase Test Lab lets you test your app on a range of different devices hosted in Google's data centers and get reports on the results.
The Test Lab creates tests called robo tests for you, and you can also create and run your own tests. To run your app in the Test Lab:
- In Android Studio: Build > Build APK.
Locate the APK in your computer's file system. It will likely be in
app/build/apkorapp/build/outputs/apkin the directory where the Android Studio project is saved.On Mac, you can click Reveal in Finder to see the location of the APK.
In the Firebase console select Test Lab > Run a Test.
- Upload your APK.
- From the matrix of devices and API levels that appears, choose the combination of devices to run your app on.

- Choose Start N Tests at the bottom right of the device matrix, where N is the valid combination of devices and API levels you have chosen.
- View the report when the tests have finished.

As well as running the auto-generated "robo" tests, you can also run your own instrumentation tests, which are tests you have written specifically to test your app. For example, you can run Espresso tests in the Test Lab.
When you write instrumentation tests, you create a second APK to upload to Test Lab along with the APK for your app.
Learn more at Firebase Test Lab for Android Overview.
Firebase Demo
There is a public Firebase demo project that you can use to explore the Firebase console. The Firebase demo project is a standard Firebase project with fully functioning analytics, crash reporting, test lab, and more. Anyone with a Google account can access it. It's a great way to look at real app data and explore the Firebase feature set.
You cannot send notifications from the demo project, because you do not have owner access to it. Nor can you see and modify data in the database.
The data in the demo project is real data from an app called Flood-It. You can download this app and use it to contribute to the data yourself. Flood-It is a simple game, where you see how quickly you can cover the board with a single color. Flood-It was created by Lab Pixies, which is now a Google company.
Go ahead and download and play Flood-It if you want, but don't forget to come back and keep learning! Get the Flood-It app from Google Play here.
Learn how to access the Firebase demo in the Firebase help center.
More Firebase features
Firebase has many more tools to help you develop your app and help it reach your audiences. However, our goal in discussing Firebase in this course is to introduce you to Firebase and make you aware of its features, and to inspire you to learn more about Firebase on your own.
To get started learning on your own about Firebase:
- Do the "Firebase in a Weekend" online course www.udacity.com/course/ud0352
- Work through the Firebase codelab codelabs.developers.google.com/codelabs/firebase-android
Learn more about Firebase
Get started with Firebase
- Firebase console
- Add Firebase to your Android project
- Firebase public demo
- Firebase in a Weekend online course
- Firebase codelab
Firebase Analytics
- Add Firebase Analytics to your Android app
- Key metrics available in the Firebase Analytics dashboard
- Predefined events: FirebaseAnalytics.Event
- Predefined parameters: FirebaseAnalytics.Param
Firebase Notifications
Firebase Database
Firebase Test Lab
This course has been updated!
A new version of this course is now available, updated to reflect best practices for more recent versions of the Android framework and Android Studio. The new course is available at Android Developer Fundamentals course (Version 2), or go directly to the new Concepts reference.
This course is now deprecated and this content will be removed from this site soon. Please update your links.
Make money from your app
It's exciting to build an app and see it run. But how do you make money from your app?
First, you need to create an app that works well, is fast enough, doesn't crash, and is useful or entertaining. It must be compelling so users will not only want to install and use it, but will want to keep on using it.
Assuming your app is robust and provides features that are useful, entertaining, or interesting, there are various ways for you to make money from your app.
Ways to make money
The monetization models are:
- Premium model—users pay to download app.
- Freemium model:
- downloading the app is free.
- users pay for upgrades or in-app purchases.
- Subscriptions—users pay a recurring fee for the app.
- Ads—the app is free but it displays ads.
Premium apps
Users pay up front to download premium apps. For an app that provides desirable functionality to a small, highly targeted audience, attaching a price to your app can provide a source of revenue. Be aware that some users will refuse to download an app if they have to pay for it, or if they cannot try it first free of charge. If users can find other similar apps that are available free or at a lower cost, they might prefer to download and try those other apps.
Freemium apps
A "freemium" app is a compromise between a completely free app and one that charges a fee to install. The app is available for installation free of charge either with limited functionality or for a limited duration. Your goal for a freemium app should be to convince users of the value of your app, so that after they have used it for a while, they are willing to pay to keep using it or to upgrade for more features. Have you ever downloaded a free app and then paid for the upgraded functionality? What was it you liked about the app that made you want to pay for it?
Another way to make money from a freemium app is to provide in-app purchases. For a game, your app might offer new content levels in the game, or new items to make the game more fun. Think about the mobile games you have played. Which ones have offered in-app purchases and what for? Have you ever made in-app purchases on a mobile app?
Subscriptions
With the subscription model, users pay a recurring fee to use the app. This is very similar to the premium model, except that users pay at regular billing cycles rather than once at installation time. You can set up subscriptions so that users pay either monthly or annually. If you provide your app on a subscription basis, consider offering regular content updates or some other service that warrants a recurring fee.
If you decide to offer your app on the subscription model, it's a good idea to let users have a free trial. Many users will refuse to install an app that makes them pay before they have even tried it to see if it suits their needs.
Ads
One common monetization strategy is to provide your app free of charge but run ads in it. The user can use your app as much as they like, but the app will show them ads occasionally.
If your app displays ads, always be considerate of the user. If your app shows so many ads that it annoys the user, they might stop using it or uninstall it.
Adding ads to your app is straightforward. The best way to incorporate ads into your app is to use AdMob.
This course has been updated!
A new version of this course is now available, updated to reflect best practices for more recent versions of the Android framework and Android Studio. The new course is available at Android Developer Fundamentals course (Version 2), or go directly to the new Concepts reference.
This course is now deprecated and this content will be removed from this site soon. Please update your links.
AdMob
Google provides tools for advertisers to create ads and define the targeting criteria for their ads. For an example of targeting criteria, an ad might be targeted to be shown to people in a specific location. Google has a huge inventory of ads to display on both websites and mobile apps. You can display ads from this inventory in your app by using AdMob (which stands for Ads on Mobile).
To display an ad in your app, add an AdView in the layout of an activity and write a small amount of boilerplate code to load the ad. When a user runs your app and goes to that activity, an ad appears in the AdView. You do not need to worry about finding an ad to display because Google handles that for you.
How ads help you make money
Google pays you when users click ads in your app. The exact amount you get paid depends on the ads that get shown, and how much the advertisers were willing to pay for their ads. The total amount paid by the advertisers is distributed between Google and the publisher of the website or app where the ad appears.
Don't click on ads in your own app
Google has policies that prevent website publishers and app publishers from clicking ads in their own websites and apps. The advertisers pay when people click their ads, so it would not be fair for you to display an ad in your app, then click the ad, and cause the advertiser to pay you for clicking the ad in your own app.
Read more about AdMob policies in the AdMob help center.
Create an AdMob account
Before you can experiment with running ads in your app, you need to enable AdMob for that app. To enable AdMob use these steps:
- In the Firebase console, select AdMob in the left hand navigation, then select Sign Up For AdMob.

You will be re-directed to the AdMob console.
- Follow the sign up wizard to create your AdMob account and add your app to AdMob.
To display an ad in your app, you need your AdMob app ID and an ad unit ID. You can get both of these in the AdMob console.
Implement AdMob in your app
To display an ad in your app:
- Make sure you have added your app to your Firebase project.
- Add the dependency for firebase-ads to your app-level build.gradle (Module: app) file: (where x is the latest version)
compile 'com.google.firebase:firebase-ads:x.x.x' - Add an
AdViewto the layout for the activity that will display the ad. - Initialize AdMob ads at app launch, by calling
MobileAds.initialize()in theonCreate()method of your main activity. - Update the
onCreate()of that activity to load the ad into theAdView.
Get ready to run test ads
While you are developing and testing your app, you can display and test ads to make sure your app is setup correctly to display ads. When testing ads you need:
- Your device ID (IMEI) for running test ads. To get the device ID either:
- Go to Settings > About phone > status> IMEI.
- Dial *#06#.
- Your AdMob app ID. Get this in the AdMob console.
- An ad unit ID. Get this in the AdMob console.
Add the AdView to display the ad
In the activity's layout file where you want the ad to appear, add an AdView:
<com.google.android.gms.ads.AdView
    android:id="@+id/adView"
    android:layout_width="wrap_content"
    android:layout_height="wrap_content"
    android:layout_marginLeft="16dp"
    android:layout_centerHorizontal="true"
    ads:adSize="BANNER"
    ads:adUnitId="@string/banner_ad_unit_id">
</com.google.android.gms.ads.AdView>
You also need to add the ads namespace to the root view of the layout:
<RootLayout xmlns:android="http://schemas.android.com/apk/res/android"
    xmlns:ads="http://schemas.android.com/apk/res-auto"
    …>
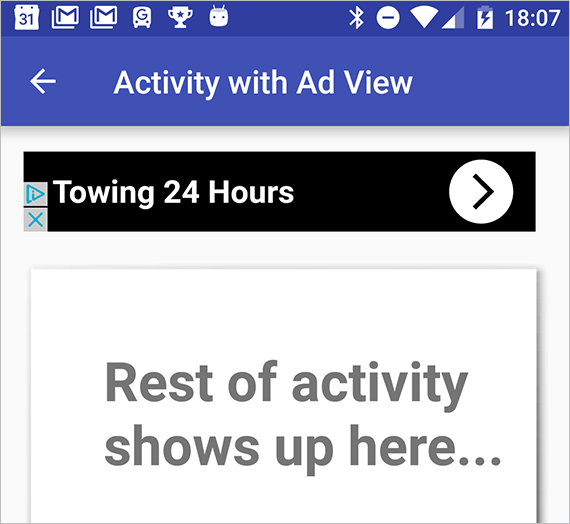
Here's an example of a layout with an AdView in the Layout Editor:
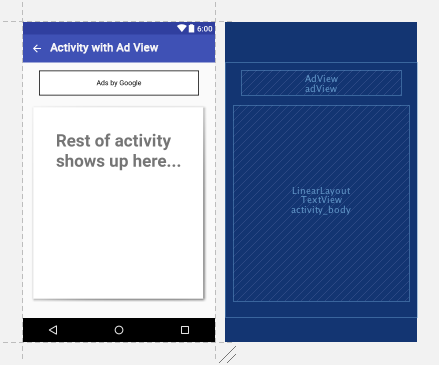
When the app runs, the AdView is replaced by an ad.
Initialize MobileAds
The MobileAds class provides methods for initializing AdMob ads in your app. Call MobileAds.initialize() in the onCreate() method of your main activity, passing the context and your app ID (which you get from the AdMob console).
// Initialize AdMob
MobileAds.initialize(this, "ca-app-pub-1234");
Write the code to load the ad
In the onCreate() method of the activity that displays the ad, write the code to load the ad.
While you are developing and testing your app you can display ads in test mode by specifying specific test devices. To show ads on your own device, you need to device ID (IMEI), which you can get from Settings > About phone > Status> IMEI or by dialling *#06#.
To load an ad:
- Get the
AdViewwhere the ad will appear. - Create an
AdRequestto request the ad. - Call
loadAd()on theAdViewto load the ad into theAdView.
Here's the code to write in onCreate() in the activity:
// Get the AdView
AdView mAdView = (AdView) findViewById(R.id.adView);
// Create an AdRequest
AdRequest adRequest = new AdRequest.Builder()
  // allow emulators to show ads
  .addTestDevice(AdRequest.DEVICE_ID_EMULATOR)
  // allow your device to show ads
  .addTestDevice("1234") // your device id
  .build();
// Load the ad into the AdView
mAdView.loadAd(adRequest);
When you are ready to run ads for real, you'll need to make some changes to how you create the AdRequest object. See Get Started with Android AdMob for more information on what you need to do.
Learn more about AdMob
- Earn from your Android apps
- Get started with AdMob in Android Studio
- Set up Android for AdMob
- Sign up for AdMob
- Access AdMob console after you have signed up
- You can also access the AdMob console from the AdMob link in the Firebase console)
- AdMob help center
- AdMob policies
- Anti-spam (don't click on ads in your own apps) policies
- AdMob glossary